
Utilizing Review Tools
Tamr Cloud provides tools to help you find mastered entities and source records to review, including the ability to sort, filter, and configure tables, search for specific terms, bookmark mastered entities, and save table views for reuse.
Sorting and Filtering Tables
You can sort and filter table data. You can also configure column order and which columns are included in the table.
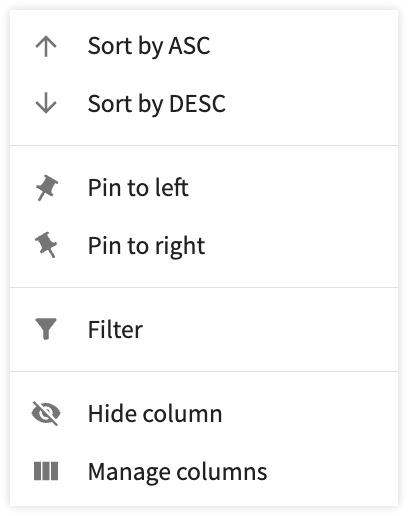
Select More![]() to open the column sort, filter, and configuration options.
to open the column sort, filter, and configuration options.
You can sort several columns at once. Hold Command (Mac) or Shift (Windows), when selecting columns' sort arrows to do this. You can tell the sorting priority by the numbers next to the arrows.

For example, in the screenshot above, region is sorted in ascending order first, followed by city in ascending order.
Filtering Table Data
You can filter by values in one or more table columns, using AND/OR logic.
To filter table data:
- Move your cursor over the column and select More
 .
. - Select Filter.
The Filter dialog opens, with the column pre-selected from the Columns dropdown. - Select the operator from the Operator dropdown.
- For text fields, operators are
Contains,Does not contain,Equals,Does not equal,Is empty(blank ornull),Is not empty(is not blank ornull),Is blank,Is not blank,Is nullandIs not null.
Note: A blank value is a string with only whitespace or 0 characters. - For numeric fields, operators are
=,!=,>,>=,<,<=,Is null, andIs not null.
- For text fields, operators are
- Enter the value by which to filter in the Value field. Filter values are case-insensitive.
The table is filtered in real-time as you enter the value. - Add additional filters by selecting Add Filter and select either
AndorOr. Select the column and operator, and enter the value by which to filter. - Remove a filter by selecting the
 next to the filter or select REMOVE ALL to remove all table filters.
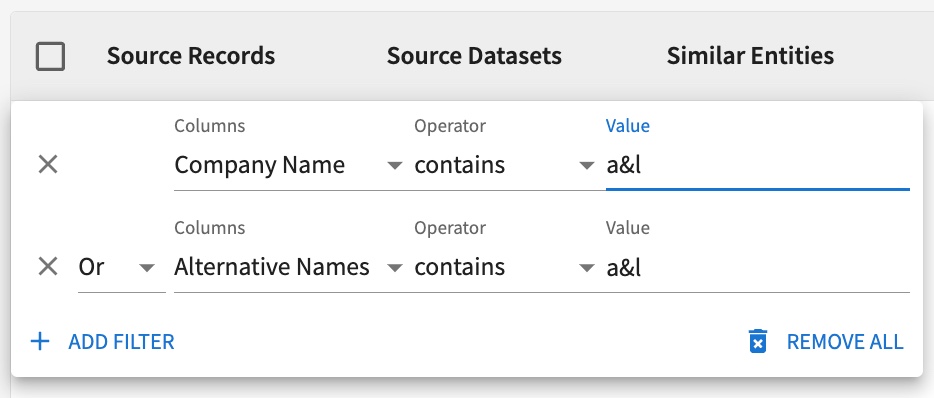
Table data is filtered to entities in which the "Company Name" field contains "a & l" OR the "Alternative Names" field contains "a&l". Filtering is case-insensitive.
You can also filter mastered entities to only those with pending user changes (via Move, Merge, or Create New). These changes remain pending until the next time you run the mastering flow. When you select Filter by Condition at top right, you can filter to the following options.
Verification:
- Unverified: Entities containing only unverified source records.
- Partially verified: Entities containing both verified and unverified source records.
- Fully verified: Entities containing only verified source records.
Pending Changes:
- Has pending source record verifications: Entities with verified source records.
- Has pending source record verification removals: Entities with source records which had their verifications removed.
- Has pending source record additions: Entities with source records added through a merge with another entity, or moved records from other entities.
- Has pending source record removals: Entities with source records moved to other entities.
- Is pending deletion: Entities with all records moved to other entities, meaning these entities will be retired.
- Select all: Entities with any changes.
Changes Since Last Run:
- Created: New entities created during the last mastering flow run.
- Source Records Added: Entities with new source records added.
- Source Records Removed: Entities that had source records removed from them.
- Select all: Either newly created entities, entities with new source records, or entities that had source records removed.
Bookmarked:
Filter to bookmarked records by selecting Yes, or non-bookmarked records by selecting No.
Attribute Overrides:
Filter to records with attribute overrides by selecting Yes, or records without attribute overrides by selecting No.
In Admin > Users, you can filter to users that are enabled by sorting the Enabled column to TRUE. To filter to users who are not enabled, filter this column to FALSE values.
Searching Tables
You can search across all attributes in the mastered entities table by selecting the  and entering your search query. You can search for a single term at a time, and apply table filtering and show or hide specific columns to further refine search results. Refer to Filtering Table Data.
Bookmarking Entities
You can use bookmarks to flag certain important entities. To bookmark an entity, select the star  in the entity’s row, or in the entity details page. This can be useful if you have entities you need to review often, or if you want to be able to find your bookmarked entity quickly. For example, if you have top assets in your data which you want to monitor closely, you can bookmark these entities to be able to review changes and activity to these entities. Use the Filter by Conditions dropdown to filter to Bookmarked entities. Then, add a table view for your bookmarked entities, so that you can return to this view at any point. To remove a bookmark, select the yellow star
  . Admins and editors can add and remove bookmarks, while viewers, publishers, and curators can view bookmarked entities.
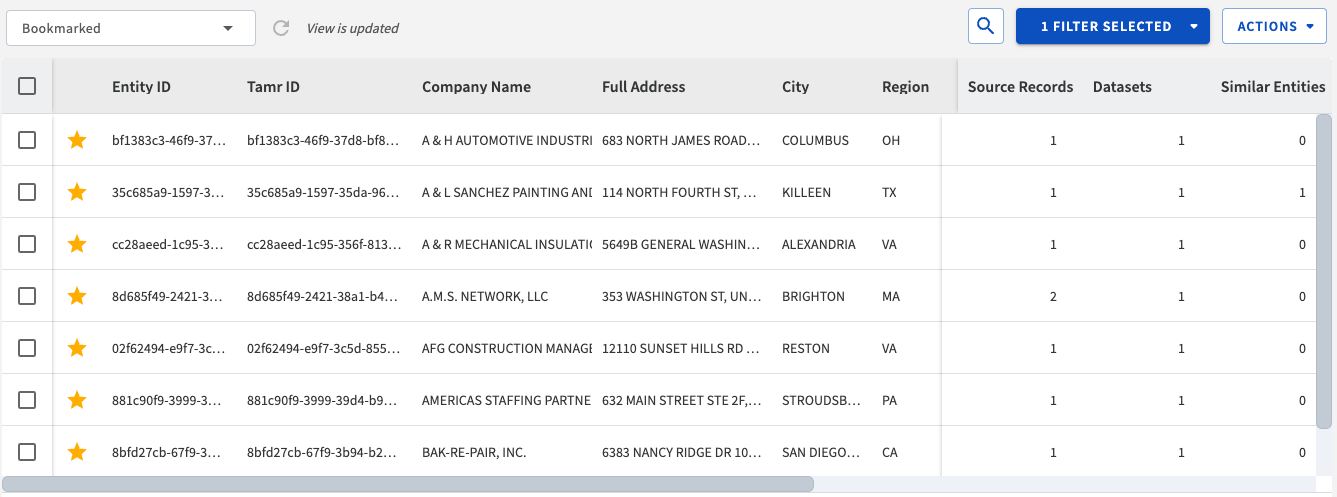
A saved table view of bookmarked entities.
Saving Table Views for Reuse
You can create and save table views of your data. Configure your table using any combination of the sorting, filtering, and format options, and then save those settings for later use. Admins can configure a default view for all users, or you can set a default view for yourself if your admin hasn’t done it for you. You can save up to six different views to switch between. Use these custom saved views to configure data display.
Saving a Table View
Save a customized table display for reuse.
To add a table view:
- Configure a table view by adjusting the width of columns, and filtering, sorting, and reordering columns.
- Open the Views dropdown.
- Select Add New.
- Enter a name and optional description for your custom view.
- To make this view your default, check the option Make Default View. This option is not available if your admin has already set the default view.
Note: In the Views dropdown, you can also select to make a view your default.
 - Select Apply to save.
Editing Table Views
If you select a view and then further customize the display of the columns or rows, you can update the view to retain those changes, or save the changes as a new view. Alternatively, you can discard those temporary changes and reset the view to its original configuration.
To update an existing view:
- Open the Views dropdown and select a view.
- Make changes to the view by adjusting the width of columns, and filtering, sorting, and reordering columns.
- Move your cursor over Save View, then select one of the following options.
- Save: This option updates your view to save your additional adjustments.
- Save as: This option creates a new view for the current table configuration, and leaves the original view unchanged. If available, to make this view your default, check the option Make Default View.
Note: Make Default View is unavailable when there is an admin-set default view.
- Select Apply to save.
To reset a table view: Next to the Views dropdown, select Reset  . Select Confirm to reset your table view.
To update the name or description of a table view: In the Views dropdown, next to the table view you want to edit, select More ![]() > Edit
> Edit ![]() . Adjust the settings, then select Apply.
. Adjust the settings, then select Apply.
To delete a table view: In the Views dropdown, next to the table view you want to delete, select More ![]() > Delete
> Delete ![]() . Then choose Confirm to delete.
. Then choose Confirm to delete.
Setting a Global Table View
Site administrators, data product owners, and data product editors can set a global default table view for other users. When a user sets a global default view, that view becomes the default for all other users in the data product.
To share a global table view:
- Open the Views dropdown.
- Next to the table view you want to share, select More
 > Share
  .
. - Select Apply to make this table view the global default for all users in this data product.
Note: When a user shares a global view with you, this becomes your default view. If you had a personally set default view, you can still find this view in the Views dropdown, but it will no longer be your default as your admin overwrote the default.
Exporting Table Data
If you have publisher (or higher) permissions for your data product, you can select Export Sample to quickly download the table data on the page. Configure the number of rows to download at the bottom of the table.
Managing Table Density
At the bottom of tables, select Density  to change the density of the table’s rows.
Updated 2 months ago